
K3s is a highly available, certified Kubernetes distribution designed for production workloads in unattended, resource-constrained, remote locations or inside IoT appliances.
Before you start
Note that this tutorial uses AWS resources that are outside the AWS free tier, so be careful!
Introduction
With K3s you can deploy a production environment only in a few minutes.
The main features of K3s are:
- Packaged as a single binary.
- Lightweight storage backend based on sqlite3 as the default storage mechanism. etcd3, MySQL, Postgres also still available.
- Wrapped in simple launcher that handles a lot of the complexity of TLS and options.
- Secure by default with reasonable defaults for lightweight environments.
- Simple but powerful “batteries-included” features have been added, such as: a local storage provider, a service load balancer, a Helm controller, and the Traefik ingress controller.
- Operation of all Kubernetes control plane components is encapsulated in a single binary and process. This allows K3s to automate and manage complex cluster operations like distributing certificates.
- External dependencies have been minimized (just a modern kernel and cgroup mounts needed).
K3s packages required dependencies, including:
- containerd
- Flannel
- CoreDNS
- CNI
- Host utilities (iptables, socat, etc)
- Ingress controller (traefik)
- Embedded service loadbalancer
- Embedded network policy controller
Requirements
For this tutorial you need:
- Terraform - Terraform is an open-source infrastructure as code software tool that provides a consistent CLI workflow to manage hundreds of cloud services. Terraform codifies cloud APIs into declarative configuration files.
- Amazon AWS Account - Amazon AWS account with billing enabled
- kubectl - The Kubernetes command-line tool (optional)
- aws cli AWS command line tool (optional)
Project Structure
The first step is to colne this repository.
git clone https://github.com/garutilorenzo/k3s-aws-terraform-cluster.git
The core of this repo is the k3s_cluster directory, this directory is the terraform module that will deploy our infrastructure. The main.tf file is the entrypoint of our deployment, see Environment setup for more info.
The “magic” parts of the repo are the .sh files under the files directory.
This files will automatically install and configure our K3s cluster, let’s take a look at k3s-install-server.sh
#!/bin/bash

apt-get update
apt-get install -y software-properties-common unzip
DEBIAN_FRONTEND=noninteractive apt-get upgrade -y
curl "https://awscli.amazonaws.com/awscli-exe-linux-x86_64.zip" -o "awscliv2.zip"
unzip awscliv2.zip
sudo ./aws/install
rm -rf aws awscliv2.zip

local_ip=$(curl -s http://169.254.169.254/latest/meta-data/local-ipv4)
flannel_iface=$(ip -4 route ls | grep default | grep -Po '(?<=dev )(\S+)')
provider_id="$(curl -s http://169.254.169.254/latest/meta-data/placement/availability-zone)/$(curl -s http://169.254.169.254/latest/meta-data/instance-id)"

first_instance=$(aws ec2 describe-instances --filters Name=tag-value,Values=k3s-server Name=instance-state-name,Values=running --query 'sort_by(Reservations[].Instances[], &LaunchTime)[:-1].[InstanceId]' --output text | head -n1)
instance_id=$(curl -s http://169.254.169.254/latest/meta-data/instance-id)
first_last="last"

CUR_HOSTNAME=$(cat /etc/hostname)
NEW_HOSTNAME=$instance_id

hostnamectl set-hostname $NEW_HOSTNAME
hostname $NEW_HOSTNAME

sudo sed -i "s/$CUR_HOSTNAME/$NEW_HOSTNAME/g" /etc/hosts
sudo sed -i "s/$CUR_HOSTNAME/$NEW_HOSTNAME/g" /etc/hostname

if [[ "$first_instance" == "$instance_id" ]]; then
    echo "I'm the first yeeee: Cluster init!"
    first_last="first"
    until (curl -sfL https://get.k3s.io | K3S_TOKEN=${k3s_token} sh -s - --cluster-init --node-ip $local_ip --advertise-address $local_ip --flannel-iface $flannel_iface --tls-san ${k3s_tls_san} --kubelet-arg="provider-id=aws:///$provider_id"); do
      echo 'k3s did not install correctly'
      sleep 2
    done
else
    echo ":( Cluster join"
    until (curl -sfL https://get.k3s.io | K3S_TOKEN=${k3s_token} sh -s - --server https://${k3s_url}:6443 --node-ip $local_ip --advertise-address $local_ip --flannel-iface $flannel_iface --tls-san ${k3s_tls_san} --kubelet-arg="provider-id=aws:///$provider_id"  ); do
      echo 'k3s did not install correctly'
      sleep 2
    done
fi

%{ if is_k3s_server }
until kubectl get pods -A | grep 'Running'; do
  echo 'Waiting for k3s startup'
  sleep 5
done

#Install node termination handler
if [[ "$first_last" == "first" ]]; then
  echo 'Install node termination handler'
  kubectl apply -f https://github.com/aws/aws-node-termination-handler/releases/download/v1.13.3/all-resources.yaml
fi
%{ endif }
The first part of the scritp install the unzip binary and upgrade our system, then the script install the aws cli tool.
The script then set some variables:
- the private ip of the EC2 instance
- the flannel iface of the machine (if the EC2 instance have more than one interface, we get the default interface as the flannel iface)
- build the provider-id (needed for te cluster autoscaler tool)
- get the first k3s-server instance launched
- get the instance id
- set the hostname equal to the instance id
Now the magic part: the script check if this instance is the very first k3s-server instance launced. In this case the script trigger the “cluster init” since at the moment ther is no cluster.
If the instance is not the first k3-server instance launched, the instance join the cluster.
After the installation the script wait until the kubectl command is available and get a response form the kube-api server.
The last step is to install the node termination handler since we are running on EC2 spot instances. For more detail see “Cluster resource deployed” above.
The k3s-install-agent.sh follow the same logic, but there is no logic for the “cluster init” since the instances are launched as agent.
Both k3s-install-server.sh k3s-install-agent.sh are rendered when the launch template is created. This files are then used as “user data” on all the future EC2 instances tha twill be launched. For more details see here.
All the other files uses the Terraform AWS api, for more details see the documentaton.
Environment setup
If this is the very first time you use Terraform you need to create a new access key to use with Terraform. Since Terraform initial setup is out of the scope of this tutorial, you can follow the “Prerequisites” step on this link.
Once you have your access key create in the root of the newly downloaded repository a file named terraform.tfvars. The filw will look like:
AWS_ACCESS_KEY = "xxxxxxxxxxxxxxxxx"
AWS_SECRET_KEY = "xxxxxxxxxxxxxxxxx"
edit the main.tf files and set the following variables:
| Var | Required | Desc |
|---|---|---|
AWS_REGION |
yes |
set the correct aws region based on your needs |
vpc_id |
yes |
set your vpc-id. You can find your vpc_id in your AWS console (Example: vpc-xxxxx) |
vpc_subnets |
yes |
set the list of your VPC subnets. You can find the list of your vpc subnets in your AWS console (Example: subnet-xxxxxx) |
vpc_subnet_cidr |
yes |
set your vcp subnet cidr. You can find the VPC subnet CIDR in your AWS console (Example: 172.31.0.0/16) |
cluster_name |
yes |
the name of your K3s cluster. Default: k3s-cluster |
k3s_token |
yes |
The token of your K3s cluster. How to generate a random token |
my_public_ip_cidr |
yes |
your public ip in cidr format (Example: 195.102.xxx.xxx/32) |
environment |
yes |
Current work environment (Example: staging/dev/prod). This value is used for tag all the deployed resources |
default_instance_profile_name |
no |
Instance profile name. Default: AWSEC2K3SInstanceProfile |
default_iam_role |
no |
IAM role name. Default: AWSEC2K3SRole |
create_extlb |
no |
Boolean value true/false, specify true for deploy an external LB pointing to k3s worker nodes. Default: false |
extlb_http_port |
no |
http port used by the external LB. Default: 80 |
extlb_https_port |
no |
https port used by the external LB. Default: 443 |
PATH_TO_PUBLIC_KEY |
no |
Path to your public ssh key (Default: “~/.ssh/id_rsa.pub) |
PATH_TO_PRIVATE_KEY |
no |
Path to your private ssh key (Default: “~/.ssh/id_rsa) |
default_instance_type |
no |
Default instance type used by the Launch template. Default: t3.large |
instance_types |
no |
Array of instances used by the ASG. Dfault: { asg_instance_type_1 = “t3.large”, asg_instance_type_3 = “m4.large”, asg_instance_type_4 = “t3a.large” } |
kube_api_port |
no |
Kube api default port Default: 6443 |
k3s_server_desired_capacity |
no |
Desired number of k3s servers. Default 3 |
k3s_server_min_capacity |
no |
Min number of k3s servers: Default 4 |
k3s_server_max_capacity |
no |
Max number of k3s servers: Default 3 |
k3s_worker_desired_capacity |
no |
Desired number of k3s workers. Default 3 |
k3s_worker_min_capacity |
no |
Min number of k3s workers: Default 4 |
k3s_worker_max_capacity |
no |
Max number of k3s workers: Default 3 |
Instance profile
This module will deploy a custom instance profile with the following permissions:
- AmazonEC2ReadOnlyAccess - is an AWS managed policy
- a custom inline policy for the cluster autoscaler (optional)
The inline policy is the following (Json format):
{
    "Version": "2012-10-17",
    "Statement": [
        {
            "Effect": "Allow",
            "Action": [
                "autoscaling:DescribeAutoScalingGroups",
                "autoscaling:DescribeAutoScalingInstances",
                "autoscaling:DescribeLaunchConfigurations",
                "autoscaling:SetDesiredCapacity",
                "autoscaling:TerminateInstanceInAutoScalingGroup",
                "autoscaling:DescribeTags",
                "ec2:DescribeLaunchTemplateVersions"
            ],
            "Resource": [
                "*"
            ]
        }
    ]
}
For the cluster autoscaler policy you can find more details here The full documentation for the cluster autoscaler is available here
The instance profile name is customizable with the variable: default_instance_profile_name. The default name for this instance profile is: AWSEC2K3SInstanceProfile.
Generate random token
Generate random k3s tocken with:
cat /dev/urandom | tr -dc 'a-zA-Z0-9' | fold -w 55 | head -n 1
Notes about K3s
In this tutorial the High Availability of the K3s cluster is provided using the Embedded DB. More details here
Final infrastructure overview
The final infrastructure will be made by:
- two autoscaling groups:
- one autoscaling group for the server nodes named “k3s_servers”
- one autoscaling group for the worker nodes named “k3s_workers”
- one internal load balancer that will route traffic to K3s servers
- one target group that will check the health of our K3s server on port 6433
The other resources created by terraform are:
- two launch templates (one for the servers and one for the workers) used by the autoscaling groups
- an ssh key pair associated with each EC2 instance
- a securiy group that will allow:
- incoming traffic only from your public ip address on port 22 (ssh)
- incoming traffic inside the vpc subnet on port 6443 (kube-api server)
- outgoing traffic to the internet
Notes about the auoscaling group:
- each autoscaling group will be made by 3 EC2 instance.
- the autoscaling is configured to use a mix of spot and on-demand instances.
- the total amount of the on-demand instances is 20% so for example if we launch a total of 10 instances 2 instances will be on-demand instances.
- the autoscaling group is configured to maximize the succes of the spot request using different types of EC2 instances (See Instance used above)
You can change this setting by editing the value of on_demand_percentage_above_base_capacity in asg.tf. You can require that all the EC2 will be launced using on-demand instances setting on_demand_percentage_above_base_capacity to 100. More details here
Here it is a diagram of our infrastructure:
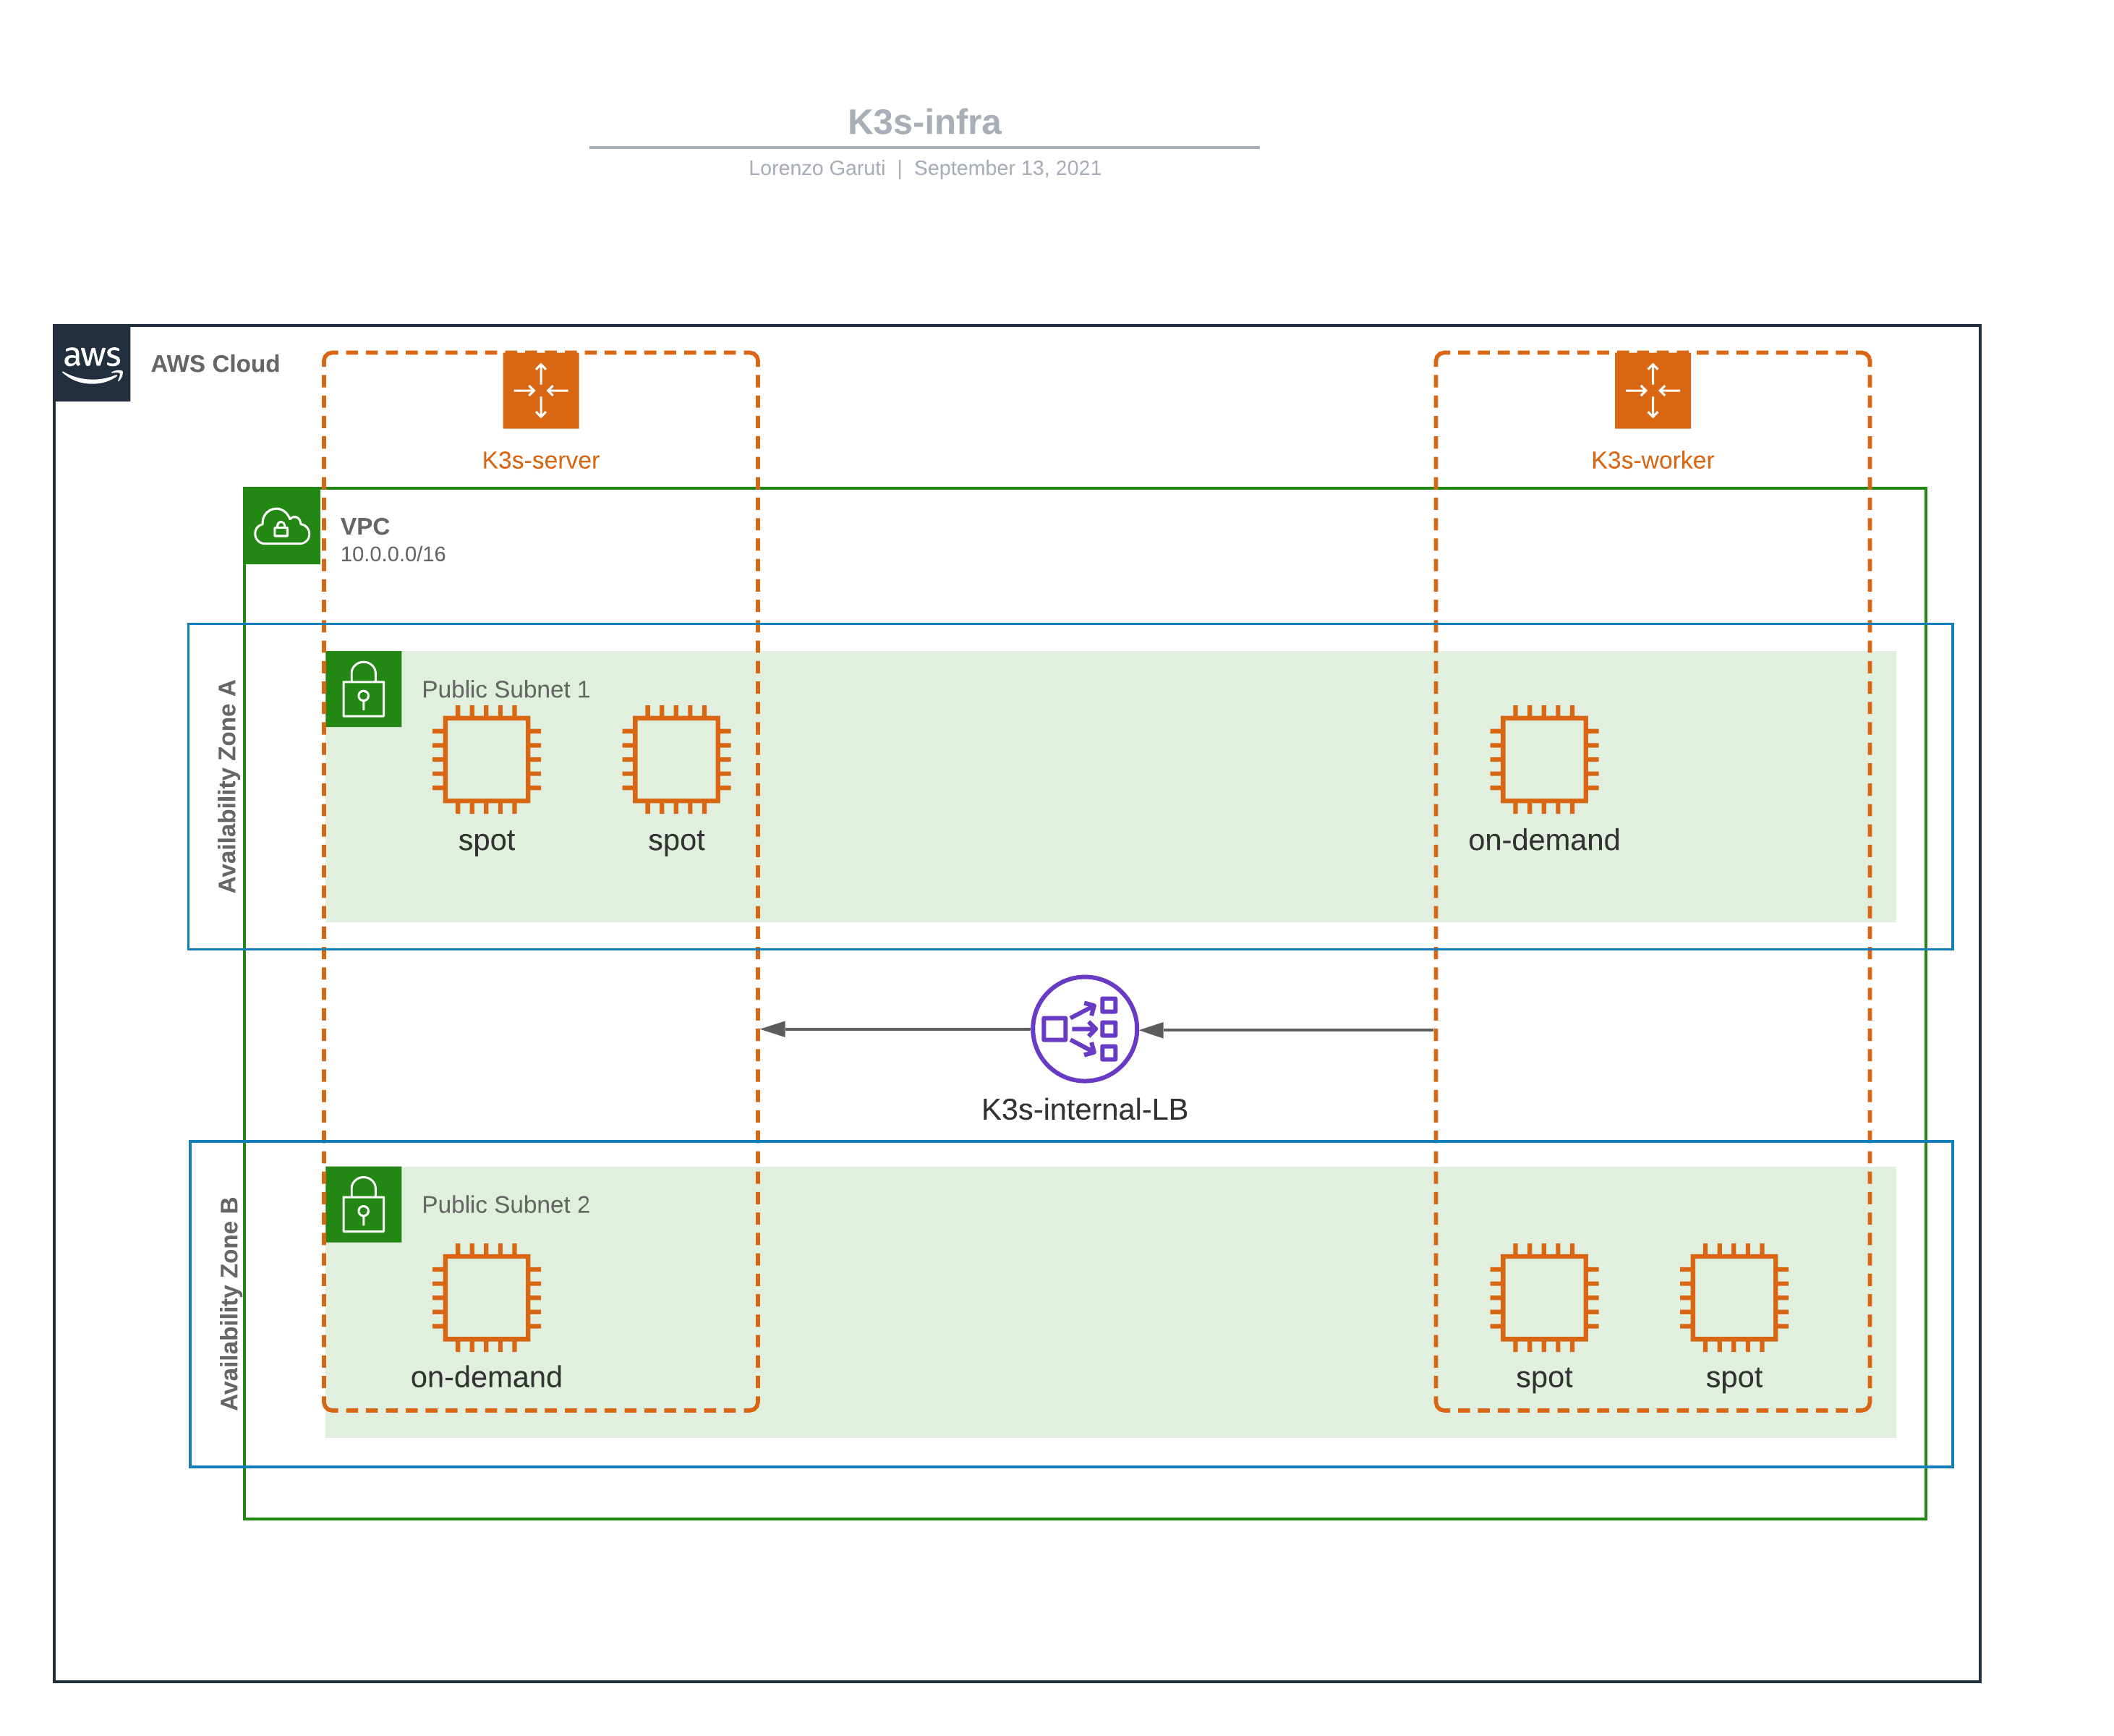
Note: in this diagram there are only two AZ, in our setup we will deploy our infrastructure in three AZ. The number of the AZ depends in which Zone you are deploying the stack.
Instances used
The types of instances used on this tutorial are:
- t3.large (default), defined in launchtemplate.tf
The other EC2 instance types are defined/overrided in asg.tf, and are:
- t3.large, like the default one
- t2.large
- m4.large
- t3a.large
With these settings there are more probability that our spot instance request will be fullified. Also the allocation strategy is a very important settings to check. In this configurations is defined as “capacity-optimized” on asg.tf
You can change the kind of instance used editing asg.tf and launchtemplate.tf
Very important note since we are deploying a Kubernetes cluster, is very important that all the instances have the same amount of memory (RAM) and the same number of CPU!
Deploy
First we need to download the Terraform provider files
terraform init
We are now ready to deploy our infrastructure. First we ask terraform to plan the execution with:
terraform plan
if everything is ok the output should be something like:
...
      + name                   = "allow-strict"
      + name_prefix            = (known after apply)
      + owner_id               = (known after apply)
      + revoke_rules_on_delete = false
      + tags                   = {
          + "Name"        = "allow-strict"
          + "environment" = "staging"
          + "provisioner" = "terraform"
        }
      + tags_all               = {
          + "Name"        = "allow-strict"
          + "environment" = "staging"
          + "provisioner" = "terraform"
        }
      + vpc_id                 = "vpc-xxxx"
    }

Plan: 15 to add, 0 to change, 0 to destroy.

Changes to Outputs:
  + k3s_elb_public_dns     = []
  + k3s_servers_public_ips = [
      + (known after apply),
    ]
  + k3s_workers_public_ips = [
      + (known after apply),
    ]

────────────────────────────────────────────────────────────────────────────────────────────────────────────────────────────────────────────────────────────────────────────────────────────────────────────────

Note: You didn't use the -out option to save this plan, so Terraform can't guarantee to take exactly these actions if you run "terraform apply" now.
now we can deploy our resources with:
terraform apply
After about five minutes infrastructure will be ready. You can now ssh into one master (you can find the ips in AWS console or use the aws command line to find the ips).
If you have the aws cli installed you can find the ips of the master nodes with:
aws ec2 describe-instances --filters Name=tag-value,Values=k3s-server Name=instance-state-name,Values=running --query "Reservations[*].Instances[*].[PublicIpAddress, Tags[?Key=='Name'].Value|[0]]"
On one master node the you can check the status of the cluster with:
ssh X.X.X.X -lubuntu

ubuntu@i-09a42419e18e4dd0a:~$ sudo su -
root@i-09a42419e18e4dd0a:~# kubectl get nodes

NAME                  STATUS   ROLES                       AGE   VERSION
i-015f4e5b0c790ec07   Ready    <none>                      53s   v1.22.6+k3s1
i-0447b6b00c6f6422e   Ready    <none>                      42s   v1.22.6+k3s1
i-06a8449d1ea425e42   Ready    control-plane,etcd,master   96s   v1.22.6+k3s1
i-09a42419e18e4dd0a   Ready    control-plane,etcd,master   55s   v1.22.6+k3s1
i-0a01b7c89c958bc4b   Ready    control-plane,etcd,master   38s   v1.22.6+k3s1
i-0c4c81a33568df947   Ready    <none>                      47s   v1.22.6+k3s1
root@i-09a42419e18e4dd0a:~#
Note after the instances are provisioned it may take up to five minutes to get kubectl command available.
Tip to check the status of the K3s installation check the /var/log/cloud-init-output.log file under /var/log directory
Cluster resource deployed
In this setup will be automatically installed on each node of the cluster the Node termination Handler. You can find more details here If for any reason you don’t need the node termination handler you can edit the k3s-install-server.sh an comment the lines from 40 to 44
Optional cluster resources
You can deploy the cluster autoscaler tool, more details here. To deploy the cluster autoscaler follow this steps:
wget https://raw.githubusercontent.com/kubernetes/autoscaler/master/cluster-autoscaler/cloudprovider/aws/examples/cluster-autoscaler-autodiscover.yaml
edit the cluster-autoscaler-autodiscover.yaml and change the command of the cluster-autoscaler deployment. The command is the following:
command:
    - ./cluster-autoscaler
    - --v=4
    - --stderrthreshold=info
    - --cloud-provider=aws
    - --skip-nodes-with-local-storage=false
    - --skip-nodes-with-system-pods=false
    - --balance-similar-node-groups
    - --expander=random
    - --node-group-auto-discovery=asg:tag=k8s.io/cluster-autoscaler/enabled,k8s.io/cluster-autoscaler/k3s-cluster
we need to edit also the ssl-certs volume. The updated volume will be:
volumes:
  - name: ssl-certs
    hostPath:
      path: "/etc/ssl/certs/ca-certificates.crt"
Note the certificate path may change from distro to distro so adjust the value based on your needs.
Now we can deploy the cluster autscaler with:
kubectl apply -f cluster-autoscaler-autodiscover.yaml
Clean up
Remember to clean all the previously created resources when you have finished! We don’t want surprises from AWS billing team:
terraform destroy